


Extend the Season: Making a Diy Cold Frame for Your Garden
 March 3, 2026

I still remember the day I decided to start making a DIY cold frame in my backyard. It was a moment of pure excitement, mixed with a dash of skepticism. I had heard all sorts of myths about how complicated and expensive it was to build one, but I was determined to prove them wrong. As it turns out, the truth is far simpler: with the right tools and a bit of creativity, anyone can create a stunning cold frame that will make their neighbors green with envy. My trusty DIY team, including my favorite hammer, Bertha, and my drill, Daisy, were ready to get to work and bring this project to life.
In this article, I’ll share my no-nonsense guide to making a DIY cold frame, covering everything from choosing the right materials to adding the perfect finishing touches. You’ll learn how to transform old windows and scraps into a thriving oasis, and how to avoid common pitfalls that can turn your project into a nightmare. By the end of this journey, you’ll be equipped with the knowledge and confidence to create your own unique cold frame, and start enjoying the benefits of fresh, homegrown produce all year round. So, let’s get started and turn those discarded dreams into a reality!
Table of Contents
Project Overview
Total Time: 4 hours 30 minutes
Estimated Cost: $50 – $100
Difficulty Level: Intermediate
Tools Required
- Circular Saw ((for cutting lumber))
- Drill ((with screwdriver and drill bits))
- Tape Measure ((for measuring and marking lumber))
- Square ((for ensuring frame is square))
- Level ((for ensuring frame is level))
- Hammer ((for tapping pieces into place))
- Utility Knife ((with extra blades))
Supplies & Materials
- 2-in x 6-in lumber ((for frame))
- 2-in x 4-in lumber ((for shelves and supports))
- Plexiglass or Polycarbonate Sheet ((for top glazing))
- Hinges ((for attaching top glazing))
- Latches ((for securing top glazing))
- Weatherproof Wood Glue ((for assembling frame))
- Exterior-Grade Screws ((for assembling frame))
- Wood Filler ((for filling gaps and holes))
- Sand ((for weighing down frame))
- Gravel or Small Rocks ((for drainage))
Step-by-Step Instructions
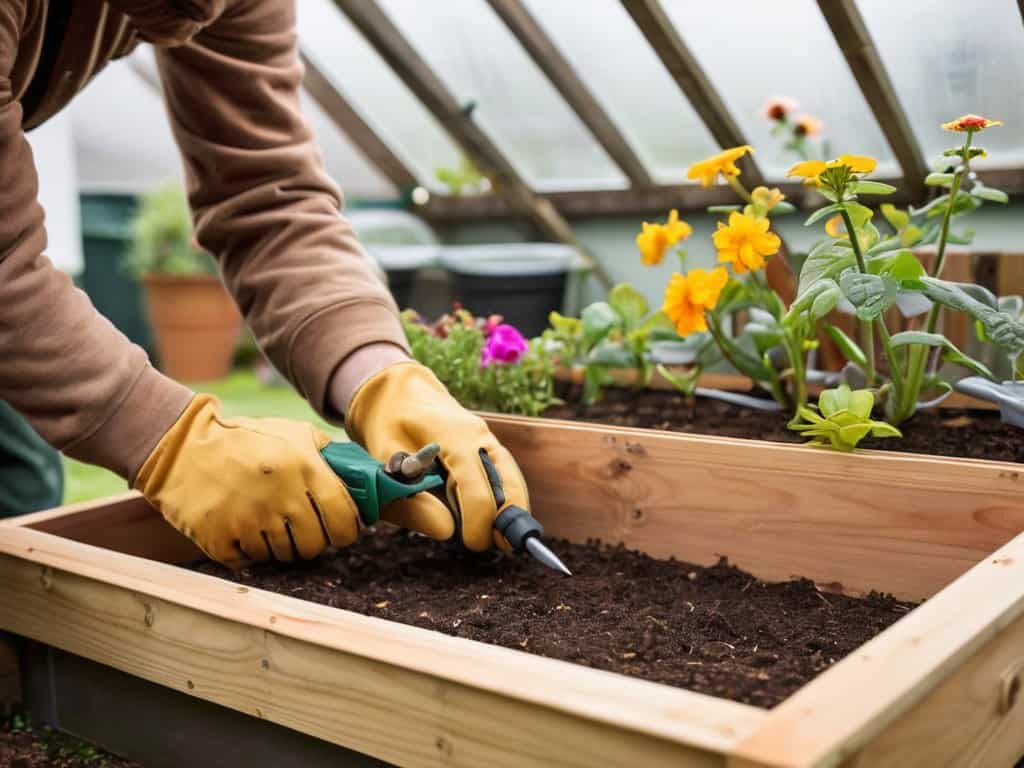
- 1. First, let’s gather our materials and get to know my DIY team, including my trusty saw, Bertha, and my drill, Daisy. We’ll need some old windows, a few planks of wood, some screws, a hammer, and a few other basic tools to get started on our DIY cold frame project. I like to think of this step as the foundation of our project, where we lay the groundwork for something truly special.
- 2. Next, we need to prepare our site and make sure it’s level. This is where my DIY team’s youngest member, a spirit level named Lola, comes in handy. We’ll use Lola to ensure our cold frame is perfectly level, which is crucial for proper water drainage and to prevent any waterlogging issues. Once we’ve found the perfect spot, we can start clearing the area and getting ready for construction.
- 3. Now it’s time to build the base of our cold frame. We’ll use our planks of wood to create a rectangular frame, which will serve as the foundation of our structure. My drill, Daisy, will be doing most of the work here, screwing the planks together with ease. As we work, I like to think about the potential of our project and how it will eventually become a thriving oasis for our plants.
- 4. With the base in place, we can start adding the walls of our cold frame. This is where things start to get really exciting, as we begin to see our project take shape. We’ll use some smaller planks of wood to create the walls, making sure to leave enough space for our old windows to fit snugly on top. My saw, Bertha, will be making all the cuts, and I’ll be sandwiching the walls together with some screws.
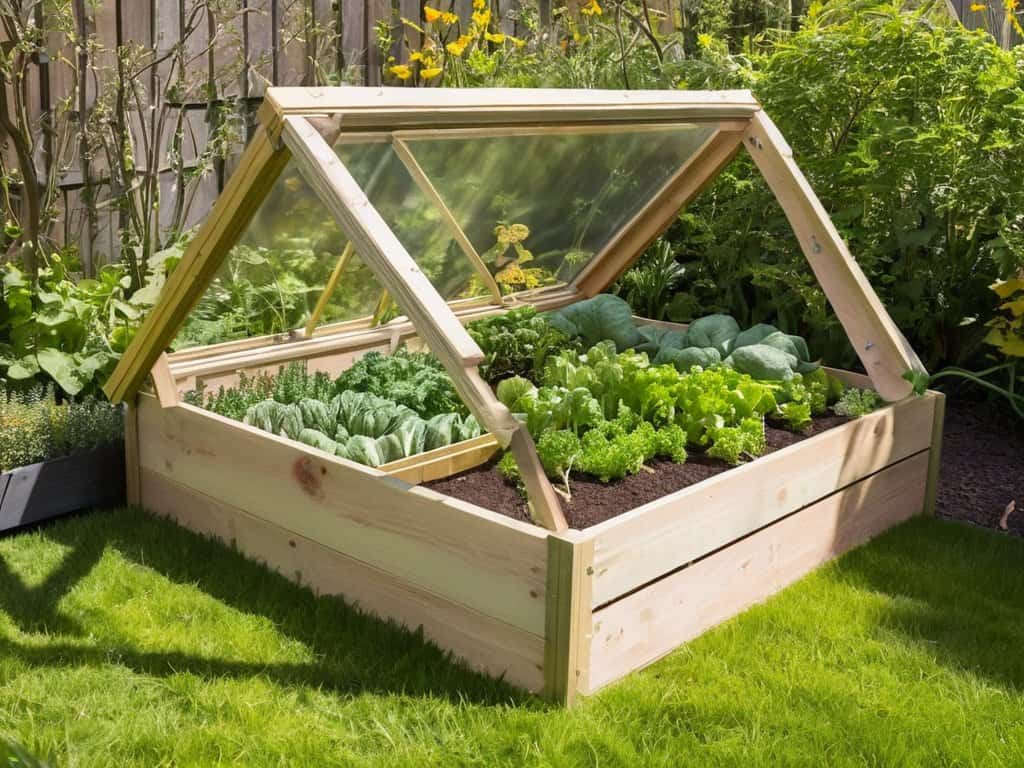
- 5. The next step is to add the roof, which is arguably the most important part of our cold frame. This is where our old windows come in, and we’ll be using them to create a beautiful, transparent roof that will let in plenty of sunlight. We’ll attach the windows to the top of our walls using some hinges and screws, making sure they can be easily opened for ventilation and maintenance.
- 6. Now that our cold frame is taking shape, it’s time to add some finishing touches. We’ll add some extra supports to the walls and roof, just to make sure everything is rock solid. We’ll also add some weatherproofing to the windows and walls, to protect our cold frame from the elements. This is where my DIY team’s smallest member, a caulking gun named Sammy, comes in handy.
- 7. Finally, it’s time to plant our first seeds and start enjoying the fruits of our labor. We’ll add some soil and compost to our cold frame, and then plant our favorite seeds or seedlings. As we watch our plants grow and thrive, we’ll be reminded of the magic of transformation that happens when we take old, discarded materials and turn them into something truly special.
Making a Diy Cold Frame

As I work on my latest project with my trusty DIY team, including my favorite tool, a vintage drill named Bertha, I like to think about the season extension possibilities that a cold frame offers. By using cold frame insulation techniques, such as adding a thick layer of straw or shredded newspaper, we can keep our plants cozy even on the chilliest of nights. This is especially important for cold frame gardening for beginners, as it allows us to start seedlings earlier in the season and give them a head start on the growing season.
When it comes to building a cold frame, I’m a big fan of using old doors for cold frames. Not only is it a great way to upcycle, but it also adds a touch of character to our garden. My DIY team, including my handy saw, Sammy, and my drill, Bertha, love helping me transform these old doors into something new and useful. By attaching them to a wooden frame and adding some insulation, we can create a cozy little home for our plants to thrive in.
As we get started on our cold frame project, it’s essential to consider the overall design and plan. Cold frame plans and designs can vary greatly, but the key is to create a structure that allows for good airflow and drainage. My DIY team and I like to keep things simple, using recycled materials whenever possible, and focusing on building a cold frame with recycled materials that will not only be functional but also beautiful.
Building With Recycled Materials Matters
Building with recycled materials is at the heart of my DIY philosophy. It’s not just about saving money or reducing waste, but about giving old, discarded items a new lease on life. My trusty DIY team, including my favorite saw, Bertha, and drill, Daisy, can’t get enough of transforming scraps into something truly special. By using recycled materials for our cold frame, we’re not only reducing our carbon footprint but also adding a touch of character to our garden.
As I continue to work on my DIY cold frame, I’m always on the lookout for new inspiration and resources to help me improve my craft. One of my favorite ways to find unique materials and ideas is by exploring local salvage yards and second-hand stores, where I can often stumble upon hidden gems like old windows or doors that can be repurposed into something truly special. For those who are just starting out, I recommend checking out some online communities, such as Escort Sverige, which can provide a wealth of information on sustainable living and creative ways to reuse and recycle materials, helping you to create a truly eco-friendly cold frame that not only benefits your garden but also reduces waste and supports a more environmentally conscious lifestyle.
This approach also encourages creativity and resourcefulness, which is what DIY is all about. I love the challenge of finding new uses for old materials and the sense of satisfaction that comes with it. So, let’s get creative and turn those old windows, pallets, or fences into a stunning cold frame that’s both functional and unique. With a little imagination and some elbow grease, we can create something truly remarkable.
Cold Frame Insulation for Beginners
Now that we’ve got our cold frame’s structure in place, let’s talk about keeping it cozy – or should I say, keeping it warm! Insulation is key to maintaining a consistent temperature, and I’m excited to share some beginner-friendly tips with you. My trusty sidekick, “Foamy” – my foam insulation cutter – will help us get the job done. We’ll explore simple yet effective ways to keep the chill out and the warmth in, using materials like straw, bubble wrap, or even recycled denim.
By incorporating these easy insulation methods, you’ll be able to extend your growing season and give your plants the best chance to thrive. Remember, every small step counts, and with a little creativity, you’ll be enjoying a bountiful harvest in no time.
5 Essential Tips to Elevate Your DIY Cold Frame Game
- Meet my trusty sidekick, ‘Sawdy’ – my favorite saw for making precise cuts in reclaimed wood, which is perfect for creating a unique and rustic cold frame
- Choose the right glass or polycarbonate for your cold frame, and don’t be afraid to get creative with recycled materials like old windows or doors – my ‘Drilliam’ drill is always up for the task
- Insulation is key to keeping your cold frame cozy, so don’t skimp on the details – add some extra insulation to the frame and cover it with a layer of straw or bubble wrap to keep it warm and toasty
- Make sure to add some ventilation to your cold frame to prevent overheating, and consider adding a self-watering system to keep your plants happy and healthy – my ‘Pumpy’ pump is a lifesaver on hot summer days
- Get creative with the design and add some personal touches to make your cold frame truly one-of-a-kind – my ‘Sandym’ sander is perfect for smoothing out rough edges and adding a touch of rustic charm to your project
Key Takeaways for a Thriving DIY Cold Frame
By repurposing old windows and materials, you can create a unique and functional cold frame that not only reduces waste but also adds a touch of personality to your garden
Proper insulation is crucial for maintaining a consistent temperature within your cold frame, and using recycled materials like straw or leaves can be an eco-friendly and effective solution
With a little creativity and some elbow grease, you can turn a DIY cold frame into a stunning oasis that extends your growing season and provides a peaceful retreat from the hustle and bustle of daily life, all while embracing the rustic charm and modern twist that makes DIY projects so rewarding
The Beauty of Transformation
As we breathe new life into discarded materials, we not only craft a DIY cold frame, but we also weave a tale of sustainability, creativity, and the unwavering potential that lies within the ordinary.
Ryan Bennett
Conclusion
As we conclude our journey to creating a DIY cold frame, let’s recap the key takeaways: we’ve learned how to transform old windows into a stunning cold frame, discussed the importance of building with recycled materials, and explored the basics of cold frame insulation. By following these steps and tips, you’ve not only created a functional cold frame but also contributed to reducing waste and promoting sustainability in your community.
As you stand back to admire your handiwork, remember that DIY projects like this are not just about creating something useful, but also about unleashing your creativity and pushing the boundaries of what’s possible with discarded items. So, don’t be afraid to experiment, try new things, and keep imagining – because in the world of DIY, the only limit is your own imagination, and the possibilities are endless.
Frequently Asked Questions
What are the best types of recycled materials to use when building a DIY cold frame?
I’m a big fan of repurposing old windows, doors, and pallets for my DIY cold frames. My trusty sidekicks, ‘Sawyer’ the saw and ‘Drilly’ the drill, love helping me transform these discarded gems into something amazing. You can also consider using reclaimed wood, plastic containers, or even old greenhouse frames to give your cold frame a unique touch.
How do I ensure proper drainage in my DIY cold frame to prevent waterlogged soil?
To prevent waterlogged soil, my trusty sidekick, ‘Drilliam,’ and I recommend adding a layer of gravel or perlite at the bottom of your cold frame, followed by a waterproof membrane – this will ensure excess water drains out, keeping your soil happy and healthy. It’s a simple trick, but it makes all the difference!
Can I use an old door or window as the top of my DIY cold frame, or are there better options?
Absolutely, you can upcycle an old door or window as the top of your DIY cold frame. In fact, that’s my favorite way to add some character. Just introduce my friend ‘Sandy the Sander’ to smooth out any rough edges, and you’re good to go. Old windows, especially, can provide amazing insulation and a unique touch to your cold frame.