


Cost-effective Ways to Install a Diy Wood Stove
 November 28, 2025
I still remember the first time I attempted a DIY wood stove installation in my small cabin. I was determined to create a cozy retreat, but the process seemed daunting. Many of my friends thought I was crazy for taking on the project myself, citing horror stories of complicated instructions and costly mistakes. However, I’ve always believed that with the right guidance and a bit of creativity, anyone can achieve a successful DIY wood stove installation. My trusty team of tools, including my favorite drill, Bertha, and my reliable level, Larry, have been with me every step of the way, helping me to transform my space into a warm and inviting haven.
In this article, I’ll share my honest, no-nonsense advice on how to navigate the DIY wood stove installation process with ease. I’ll walk you through the essential steps, from preparing your space to ensuring a safe and efficient installation. You’ll learn how to avoid common pitfalls and make the most of your project, just like I did. With my guidance, you’ll be able to create a beautiful and functional wood stove that will be the centerpiece of your home. So, let’s get started and turn your living room into a cozy retreat that you’ll love spending time in, with a DIY wood stove installation that’s both functional and visually appealing.
Table of Contents
- Guide Overview: What You'll Need
- Step-by-Step Instructions
- Diy Wood Stove Installation
- Spark to Flame: 5 Essential Tips for a Successful DIY Wood Stove Installation
- Embracing the Cozy: 3 Key Takeaways for a Successful DIY Wood Stove Installation
- Igniting Passion Through DIY
- Embracing the Warmth of DIY
- Frequently Asked Questions
Guide Overview: What You'll Need
Total Time: 8 hours 30 minutes
Estimated Cost: $800 – $1,200
Difficulty Level: Hard
Tools Required
- Drill Press (for precise hole drilling)
- Circular Saw (for cutting lumber)
- Reciprocating Saw (for demo and tight spaces)
- Tape Measure (25 feet long)
- Level (to ensure proper stove installation)
- Wrench Set (for stove and pipe connections)
- Pliers (for gripping small parts)
- Safety Glasses (for protecting your eyes)
Supplies & Materials
- Wood Stove (choose a suitable model)
- Chimney Pipe (6 inches in diameter)
- Flue Liner (to protect your chimney)
- Stove Pipe (connects stove to chimney)
- Thimble (protects surrounding material from heat)
- High-Temperature Caulk (for sealing gaps)
- 2-in x 6-in lumber (for building a hearth)
- Fireproof Insulation (to meet local building codes)
- Heat-Resistant Paint (for finishing the hearth)
Step-by-Step Instructions
- 1. First, let’s start by preparing the space where our wood stove will be installed. This means clearing the area of any furniture, curtains, or other flammable materials that could get in the way or pose a fire hazard. I like to think of this step as setting the stage for my DIY team, which includes my trusty sidekicks, a hammer named Hank and a tape measure named Terry.
- 2. Next, we need to assess the condition of our chimney or venting system to ensure it’s compatible with our wood stove. This is a crucial step, as a properly functioning chimney is essential for safe and efficient wood stove operation. I always say, a good chimney is like a good foundation – it’s the backbone of our entire installation.
- 3. Now it’s time to unpack and inspect our wood stove and its components. This includes the stove itself, the chimney pipe, and any other accessories that came with our installation kit. My drill, Daisy, is always eager to help with this step, as she knows we’re getting close to the fun part – actually building something.
- 4. With our components inspected and our area prepared, we can begin installing the wood stove. This typically involves placing the stove on a heat-resistant surface, such as a brick or stone hearth, and connecting the chimney pipe. I find that having a level, like my friend Lola, is indispensable for ensuring our stove is perfectly aligned and stable.
- 5. The next step is to connect the venting system, which may involve installing a chimney liner or other components to ensure our stove vents properly. This is where my saw, Sam, comes into play, as we may need to cut pipes or other materials to fit our specific installation. Remember, precision is key in this step, as a well-ventilated system is crucial for both safety and efficiency.
- 6. Once our venting system is in place, we can connect our wood stove to the chimney pipe. This may require some creative problem-solving, as every installation is unique, but with the right tools and a bit of patience, we can overcome any obstacles. My trusty wrench, Wendy, is always ready to lend a hand in this step.
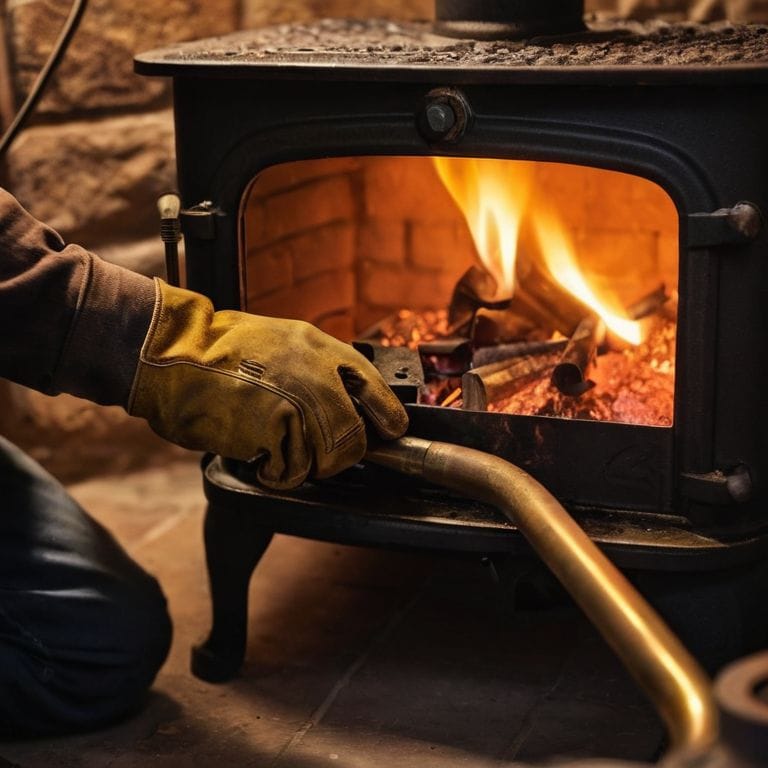
- 7. Finally, with our wood stove installed and connected to the venting system, we can test our setup to ensure everything is working as it should. This involves lighting a small fire and checking for any draft issues or leaks in the chimney. It’s a moment of truth, but with our DIY team by our side, we’re ready for whatever comes next. And when the job is done, and our wood stove is roaring to life, there’s no feeling quite like knowing we built it ourselves.
Diy Wood Stove Installation
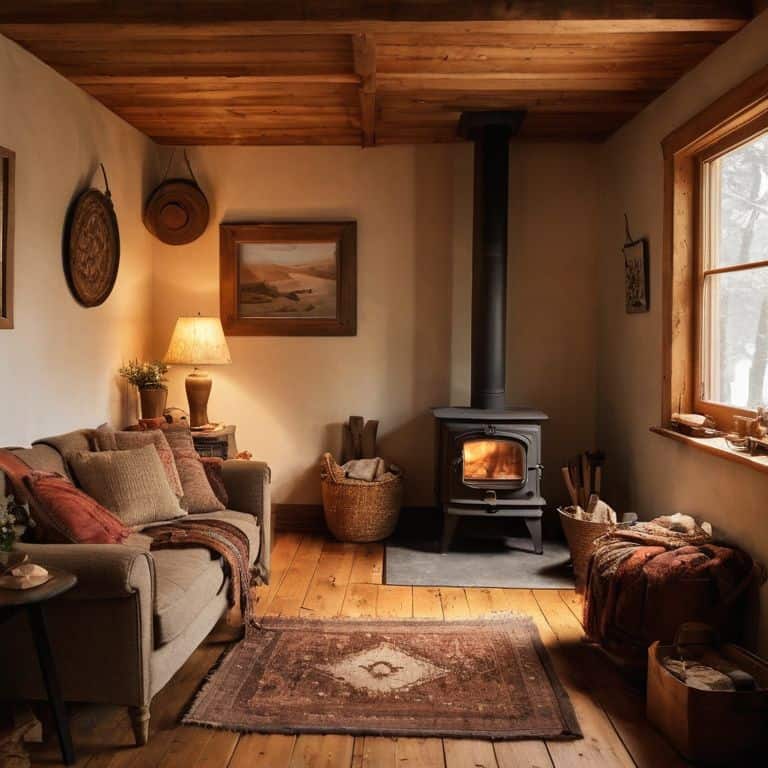
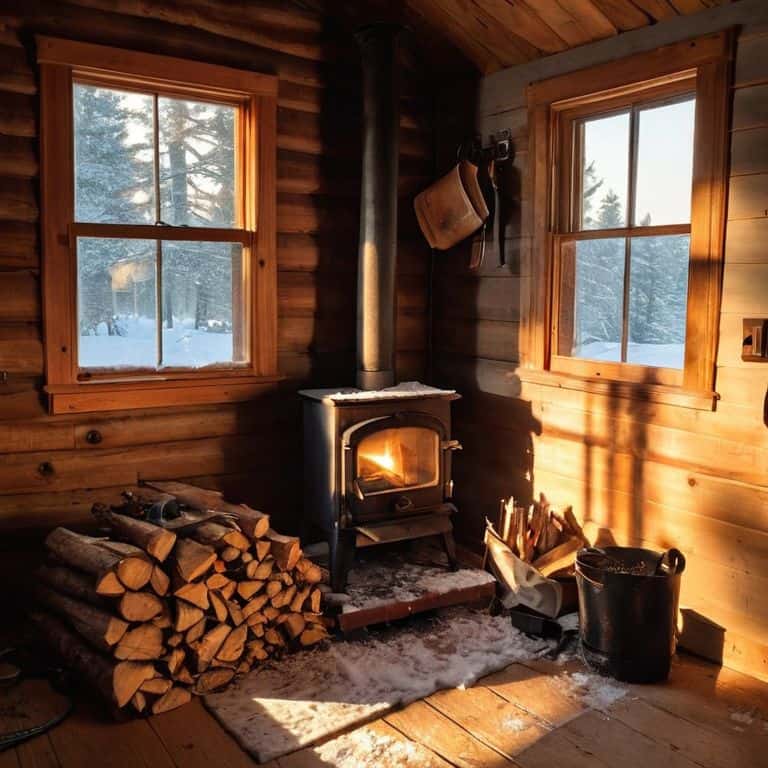
As I work on a wood stove chimney installation, I always consider the overall aesthetic I want to achieve in the room. For instance, when designing a small space wood stove options plan, it’s essential to think about the flow of the room and how the stove will be the centerpiece. My trusty tool, Bertha the level, helps me ensure everything is perfectly aligned.
When it comes to efficient wood burning techniques, I’ve found that using seasoned wood makes a huge difference. Not only does it burn cleaner, but it also produces more heat. I like to think of it as getting the most bang for my buck, and my tool, Sammy the saw, helps me cut the wood to the perfect size.
In terms of clearance requirements for wood stoves, it’s crucial to follow the manufacturer’s guidelines to ensure safety. I always double-check the specs with my DIY team, including my tape measure, Terry. By doing so, I can create a beautiful wood stove hearth design that’s both functional and visually appealing.
Small Space Wood Stove Secrets
When it comes to smaller spaces, every inch counts, and my trusty sidekick, a tape measure I’ve lovingly named “Tiny,” helps me make the most of it. To maximize space, consider compact wood stove models or those with a slim profile. I’ve worked with stoves that have a rear venting option, which can be a game-changer for smaller rooms. My drill, “Driller,” and I have spent countless hours perfecting the art of minimizing clearance requirements while ensuring safety and efficiency.
By choosing the right stove and cleverly planning the installation, you can create a cozy atmosphere even in the tiniest of spaces. I’ve seen it time and time again – a small wood stove can be the perfect addition to a tiny home, apartment, or cabin, and with the right tools and a little creativity, you can make it happen.
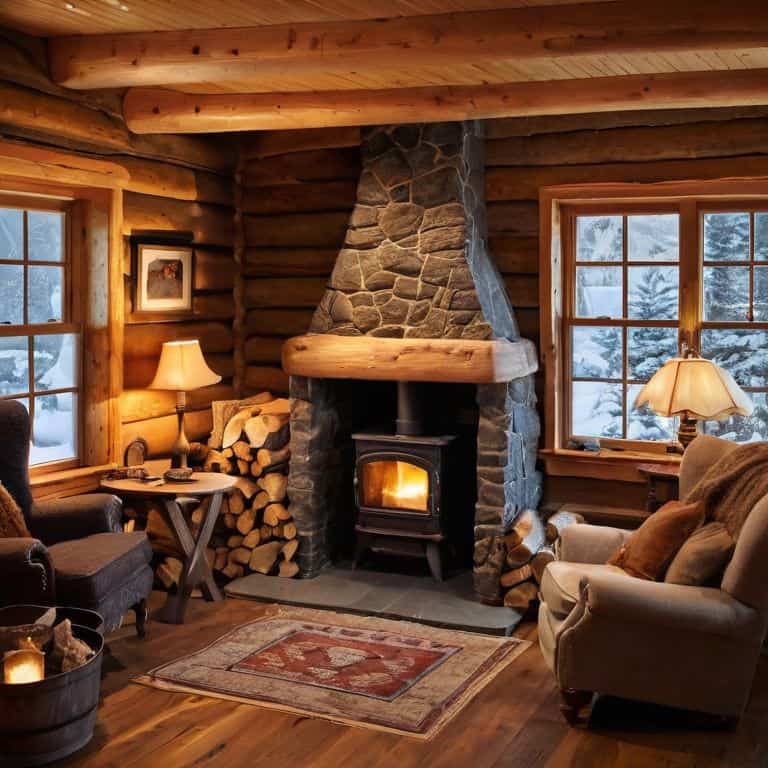
Wood Stove Chimney Magic
Now that we’ve got our wood stove in place, it’s time to talk about the often-overlooked hero of the operation: the chimney. I like to think of it as the magic wand that makes our DIY wood stove installation come together. My trusty drill, Bertha, and I have spent countless hours ensuring that our chimney is not only functional but also a design element that adds to the overall aesthetic of the room. With the right materials and a bit of creativity, you can transform your chimney into a stunning focal point that complements your wood stove perfectly.
Spark to Flame: 5 Essential Tips for a Successful DIY Wood Stove Installation
- Measure Twice, Install Once: Ensuring a proper fit is crucial, so take your time to measure your space and the stove’s dimensions to avoid any costly mistakes
- Chimney Charm: Don’t underestimate the importance of a well-installed chimney – it’s not just about function, but also about adding a touch of rustic charm to your room
- Clear the Clutter: Before you begin, make sure your workspace is clear of any flammable materials and debris, my trusty sidekicks, ‘Sawyer’ the saw and ‘Dusty’ the drill, will thank you
- Insulate and Protect: Proper insulation and protection of your floors and walls from heat damage is key, consider using hearth pads or stove boards to add an extra layer of safety and style
- Test and Enjoy: Once your wood stove is installed, test it out with a small fire to ensure everything is working smoothly, then sit back, relax, and enjoy the warm ambiance you’ve created with your own two hands
Embracing the Cozy: 3 Key Takeaways for a Successful DIY Wood Stove Installation
Always remember to measure twice and cut once – accuracy is key when it comes to fitting your wood stove and chimney perfectly, a lesson my trusty tape measure, ‘Terry,’ has taught me over the years
Choosing the right materials can make all the difference – from the type of wood to the chimney lining, select items that not only fit your aesthetic but also ensure safety and efficiency, just like my drill, ‘Daisy,’ helps me drive home
Don’t be afraid to think outside the box and get creative with your installation – whether it’s a unique chimney design or a custom hearth, make your DIY wood stove installation a reflection of your personal style, and have fun with it, just as I do with my ‘DIY team’ by my side
Igniting Passion Through DIY
As we embark on the journey of DIY wood stove installation, remember that it’s not just about the flame that burns within, but about the spark that ignites our creativity and transforms our spaces into warm, inviting sanctuaries.
Ryan Bennett
Embracing the Warmth of DIY
As we conclude our journey through the world of DIY wood stove installation, it’s essential to recap the key elements that make this project a success. From carefully planning and preparing your space to the actual installation and maintenance, every step plays a crucial role in ensuring your wood stove becomes the heart of your home. Safety first is always our motto, and by following the steps outlined, you’ll not only achieve a cozy retreat but also a safe and efficient heating solution. Remember, the transformation of your space into a warm and inviting haven is a direct result of your hard work and dedication to the craft.
As you stand back to admire your handiwork, the crackling of the fire and the warmth it brings to your home, you’ll realize that embracing the DIY spirit is about more than just a project – it’s about creating something with your own hands that brings joy and comfort to you and your loved ones. So, don’t be afraid to experiment, to try new things, and to see the potential in the ordinary. For in the world of DIY, it’s not just about the destination, but the journey itself, and the sense of pride and accomplishment that comes with it.
Frequently Asked Questions
What are the most common mistakes to avoid when installing a DIY wood stove?
When it comes to DIY wood stove installation, I’ve seen folks trip up on a few common mistakes. My trusty sidekick, ‘Measurer’ – my favorite tape measure – always reminds me to double-check clearance codes and proper ventilation. Avoiding inadequate chimney maintenance and incorrect stove sizing is also crucial, as my ‘DIY team’ and I have learned from our own projects.
How can I ensure proper ventilation and safety in my home after installing a wood stove?
Proper ventilation is key, my friends. I always say, ‘a happy stove is a well-ventilated one.’ Make sure to install a carbon monoxide detector and keep those air vents clear. My trusty sidekick, ‘Sawyer’ the saw, and I also recommend regular chimney sweeps to keep everything running smoothly and safely.
What are some creative ways to camouflage or decorate the wood stove chimney in a small living room?
I love this question! My trusty sidekick, a jigsaw named Jenny, and I have tackled this challenge before. You can camouflage the chimney with a rustic wooden enclosure or wrap it in a modern metal sleeve. Alternatively, add some greenery, like a living wall or potted plants, to distract from the chimney and bring in a natural touch.