


Diy Vertical Gardens: Maximizing Small Spaces for Food Growth
 November 30, 2025

As I step into my backyard, surrounded by the lush greenery of my diy vertical gardens, I’m often reminded of the common myth that these space-saving wonders are only for seasoned gardeners. But the truth is, with a little creativity and some well-loved tools – like my trusty trowel, Bertha – anyone can bring a slice of nature into their urban oasis. I’ve seen it time and time again, from the rolling hills of Oregon where I grew up, to the bustling cities where I now help others create their own green sanctuaries. Diy vertical gardens are not just a pretty face; they’re a gateway to a more sustainable, peaceful way of living.
In this article, I’ll share my honest, no-nonsense advice on how to create your own thriving diy vertical garden. From choosing the right plants to selecting the perfect materials, I’ll walk you through the process with the same enthusiasm and care that I bring to my own bonsai landscapes. You’ll learn how to weave a living tapestry that not only beautifies your outdoor space but also provides a haven for local biodiversity. So, let’s get started on this journey together, and turn your urban canvas into a vibrant work of art, one diy vertical garden at a time.
Table of Contents
Guide Overview: What You'll Need

Total Time: 4 hours 30 minutes
Estimated Cost: $50 – $100
Difficulty Level: Intermediate
Tools Required
- Drill (with screwdriver and drill bits)
- Measuring Tape
- Level
- Pencil
- Utility Knife (with extra blades)
- Hammer
Supplies & Materials
- 2-in x 6-in lumber (for frame)
- Wood screws (1 inch and 2 inches)
- Weather-resistant wood glue
- Pockets or planters (made of felt, plastic, or wood)
- Soil and plants (choose suitable for vertical garden)
- Irrigation system (optional)
- Wire or twine (for hanging plants)
Step-by-Step Instructions
- 1. First, let’s start by gathering our materials, which will include a wooden or metal frame, a waterproof liner, a growing medium such as soil or a soilless mix, and of course, our chosen plants. I like to think of this step as preparing for a hike, where every tool and supply is carefully considered to ensure a successful journey.
- 2. Next, we’ll need to _prepare the frame_ by cleaning and assembling it according to the manufacturer’s instructions. This is where my trusty garden tools come into play – I’ve named my drill “Daisy” and she’s always up for a challenge. With Daisy’s help, we can securely attach the frame’s components and create a sturdy base for our vertical garden.
- 3. Now it’s time to _add the waterproof liner_, which will prevent water from seeping behind the frame and causing damage to the wall or surrounding area. I find that a good liner is like a reliable map – it helps us navigate the twists and turns of gardening with confidence. Simply cut the liner to size and attach it to the frame using a strong adhesive or staples.
- 4. With the liner in place, we can start _adding the growing medium_. This is where the magic happens, as we create a thriving ecosystem that will support our plants. I like to think of this step as _layering the landscape_, where each component works together in harmony. Fill the frame with the growing medium, leaving enough space for the roots of our plants to grow.
- 5. It’s time to _choose our plants_ and start planting. For a DIY vertical garden, I recommend selecting plants that are compact and trailing, such as succulents or herbs. These will spill over the edges of the frame, creating a lush and vibrant display. Simply plant each specimen in the growing medium, leaving enough space for proper growth and air circulation.
- 6. As we _add the finishing touches_ to our DIY vertical garden, it’s essential to consider the _lighting and irrigation_ needs of our plants. Depending on the location and climate, we may need to install a trellis or other support system to ensure our plants receive the right amount of sunlight and water. I like to think of this step as fine-tuning a well-loved hiking trail, where every detail is carefully considered to create a seamless experience.
- 7. Finally, let’s _maintain and enjoy_ our DIY vertical garden. This is where the real fun begins, as we watch our plants grow and thrive in their new environment. I like to think of this step as _tending to a beloved bonsai tree_, where every snip and prune is a labor of love. With regular watering, fertilization, and pruning, our vertical garden will become a bustling oasis in the midst of the city, a testament to the power of nature and our own creativity.
Crafting Diy Vertical Gardens
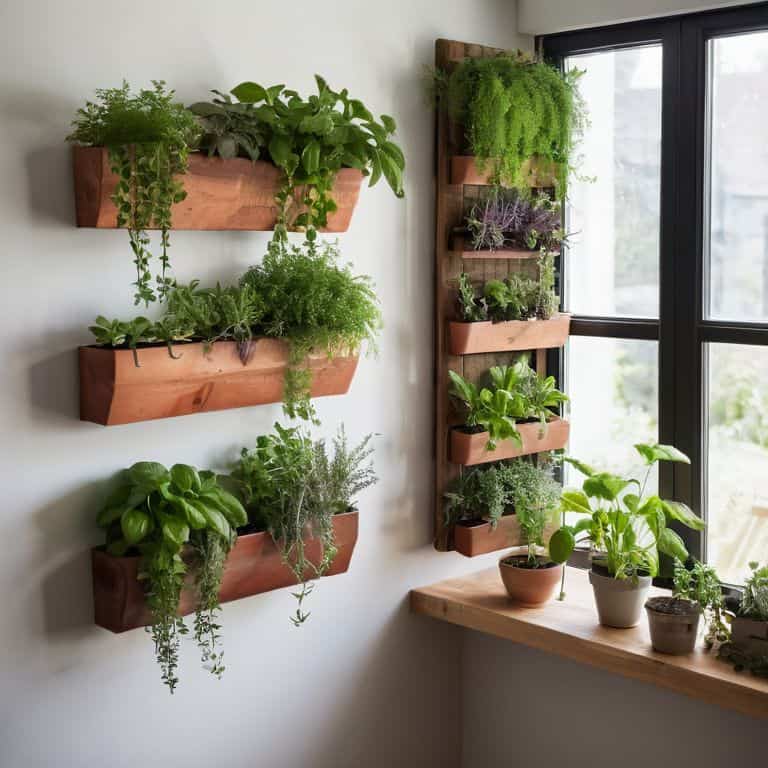
As I work on my latest space saving garden designs, I find myself pondering the perfect blend of form and function. My trusty trowel, Bertha, and I have been experimenting with indoor vertical garden systems that not only purify the air but also add a touch of natural beauty to any room. We’ve had great success with wall mounted planters for herbs, which allow for a continuous harvest of fresh flavors while keeping the overall footprint minimal.
When it comes to smaller gardens, trellis ideas can be a game-changer. I’ve seen firsthand how a well-placed trellis can transform a tiny plot into a lush oasis. My garden fork, Felix, and I have been known to get creative with recycled materials for garden planters, giving new life to old pallets and containers. This approach not only reduces waste but also adds a unique character to our urban gardening projects.
For those looking to start their own urban gardening on a budget, I always recommend beginning with a small, manageable project. My pruning shears, Sammy, and I have found that even the simplest of gardens can bring a sense of tranquility and connection to nature. By repurposing materials and thinking outside the box, anyone can create a thriving green space that nourishes both body and soul.
Reviving Walls With Indoor Vertical Garden Systems
As I work on my latest indoor vertical garden project, I find myself chatting with my trusty tools, like Bertha the trowel and Sammy the screwdriver. They seem to hum along with me as I bring dull walls to life. I recall a particular project where a living wall transformed a sterile office space into a vibrant oasis. The employees would often gather around it, marveling at the lush greens and colorful blooms. It’s moments like these that remind me of the profound impact indoor vertical gardens can have on our well-being.
With a little creativity, any wall can become a thriving canvas for plants. I love experimenting with different materials and designs to create unique indoor vertical garden systems. From trellises to pocket planters, the possibilities are endless. As I carefully place each plant, I imagine the wall coming alive, much like the bonsai landscapes I create in my spare time. The result is a harmonious blend of nature and architecture, perfect for revitalizing any indoor space.
Weaving Space Saving Garden Designs
As I work on my own DIY vertical garden, I find myself pondering the art of weaving space-saving designs. I gently instruct my trusty pruning shears, Bertha, to precision-cut each stem, allowing for a tapestry of textures and hues to emerge. By carefully selecting plants with varying growth habits and mature sizes, I create a layered, dimensional effect that adds depth to even the most compact spaces. My well-worn garden gloves, worn smooth by years of tending to my bonsai landscapes, seem to guide my hands as I arrange each element.
With each new addition, my DIY vertical garden transforms into a thriving, immersive experience. I encourage you to experiment with different combinations of plants, taking into account factors like light, water, and nutrient requirements. As you tend to your own creation, remember to talk to your tools, and they’ll seem to work in harmony with you, bringing your vision to life.
Nurturing Your DIY Vertical Garden: 5 Essential Tips
- Embrace the art of layering: When designing your DIY vertical garden, remember to leave enough space between each layer for adequate air circulation and sunlight penetration, just as I do when I’m crafting a new bonsai landscape
- Choose the right plants for the job: Select a mix of plants with varying textures, colors, and growth habits to create a visually striking and thriving vertical garden, much like the diverse flora I’ve encountered on my hiking trails
- Water wisely: Implement a clever irrigation system that delivers the right amount of moisture to each plant, taking into account the unique needs of each species and the overall microclimate of your garden
- Don’t forget the fertilizers: Feed your DIY vertical garden with a balanced, organic fertilizer to promote healthy growth and vibrant blooms, and be sure to introduce beneficial microorganisms to the soil for a thriving ecosystem
- Observe and adapt: As your DIY vertical garden grows and evolves, take note of what’s working and what areas need improvement, and be willing to make adjustments to ensure your living tapestry continues to flourish, just as I do when I’m tending to my trusty garden tools, like my faithful pruning shears, Bertha
Sowing the Seeds of Innovation
As we weave our own DIY vertical gardens, we not only bring life to the urban canvas, but also nurture a sense of harmony between nature and our built environment, reminding us that even in the most unlikely of spaces, beauty and biodiversity can thrive.
Dylan Thompson
Embracing the Vertical Garden Revolution
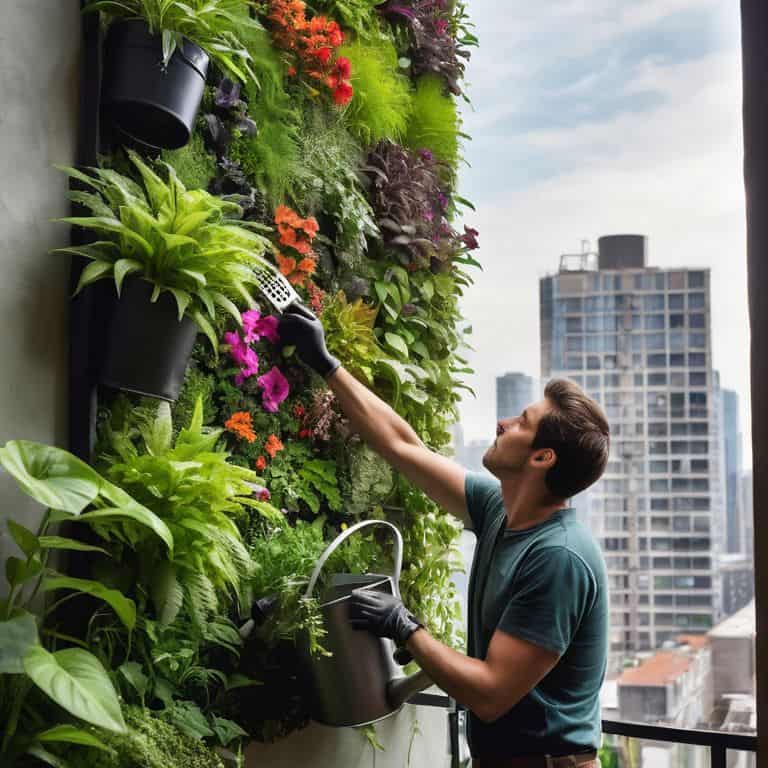
As I reflect on our journey through the world of DIY vertical gardens, I’m reminded of the transformative power of bringing nature into our urban spaces. From the initial planning stages to the final, flourishing product, crafting a vertical garden is a journey that requires patience, creativity, and a willingness to get your hands dirty. By following the steps outlined in this guide, you’ve taken the first steps towards creating your own unique, space-saving oasis. Whether you’re reviving a dull wall with an indoor vertical garden system or weaving a living tapestry in your backyard, the sense of accomplishment and connection to nature is unparalleled.
As you stand back to admire your thriving DIY vertical garden, remember that you’re not just a gardener – you’re a guardian of biodiversity, a weaver of life and beauty in the unlikeliest of places. So let your garden be a beacon of hope, a symbol of the resilience and beauty that can emerge when we work in harmony with the natural world. And as you tend to your plants, don’t forget to whisper words of encouragement to your trusty garden tools – after all, they’re an integral part of this wondrous journey!
Frequently Asked Questions
What are the best plants to use for a DIY vertical garden in a shady area?
For shady spots, I recommend using my trusty friend, ‘Leafy’ the cultivator, to plant ferns, peace lilies, or trailing ivy – they thrive in low-light conditions and add a touch of serenity to your vertical garden.
How can I ensure proper drainage and watering for my DIY vertical garden?
To ensure proper drainage and watering for my DIY vertical garden, I always make sure to add a layer of perlite or vermiculite to the soil mix, and install a drip irrigation system that my trusty watering can, Bertha, helps me set up – it’s a match made in heaven, and my plants thrive as a result!
Can I use a DIY vertical garden system to grow edible plants, such as herbs or leafy greens, indoors?
Absolutely, my friend! I just love seeing people nurture their green thumbs indoors. With a DIY vertical garden, you can easily grow a variety of edible delights, from fragrant herbs like basil and rosemary to crisp leafy greens like kale and spinach. Just be sure to provide your plants with plenty of light and the right nutrients, and you’ll be harvesting fresh flavors in no time!