


Diy Wall Shelves to Maximize Space and Style
 November 5, 2025
I still remember the first time I attempted to build DIY wall shelves in my small apartment. I was determined to add some rustic charm to my living room, but I ended up with a pile of scrap wood and a lot of frustration. The problem was, I had fallen victim to the common myth that building DIY wall shelves requires extensive carpentry experience. But the truth is, with the right tools and a bit of patience, anyone can create their own unique shelving unit. My trusty team, including my drill, Bertha, and my saw, Sally, have helped me prove that time and time again.
In this article, I’ll share my honest, no-hype advice on how to build DIY wall shelves that will add a touch of personality to any room. I’ll walk you through the entire process, from selecting the perfect reclaimed wood to adding the finishing touches. You’ll learn how to create a one-of-a-kind shelving unit that reflects your personal style, without breaking the bank or requiring a lot of specialized expertise. By the end of this guide, you’ll be equipped with the knowledge and confidence to unleash your creativity and turn any wall into a functional work of art. So, let’s get started and give your walls the makeover they deserve!
Table of Contents
- Guide Overview: What You'll Need
- Step-by-Step Instructions
- Transforming Spaces With Diy Wall Shelves
- Shelf Care: 5 Essential Tips for DIY Wall Shelf Perfection
- Key Takeaways for Your DIY Wall Shelf Project
- Shelving Wisdom
- Bringing It All Together: The Beauty of DIY Wall Shelves
- Frequently Asked Questions
Guide Overview: What You'll Need
Total Time: 2 hours 30 minutes
Estimated Cost: $50 – $100
Difficulty Level: Intermediate
Tools Required
- Drill (with screwdriver and drill bits)
- Level (to ensure shelves are straight)
- Tape Measure (for accurate measurements)
- Square (for precise corner cuts)
- Saw (circular or handheld, for cutting lumber)
- Sander (optional, for smoothing out wood)
- Hammer (for tapping shelves into place)
- Stud Finder (to locate wall studs)
Supplies & Materials
- 2-in x 4-in lumber (for shelf frames)
- 3/4-in plywood (for shelf boards)
- Wood Screws (for assembling shelves)
- Wall Anchors (for securing shelves to walls)
- Wood Glue (for reinforcing shelf frames)
- Sandpaper (for smoothing out wood surfaces)
- Paint or Stain (optional, for finishing shelves)
- Decorative Trim (optional, for covering edges)
Step-by-Step Instructions
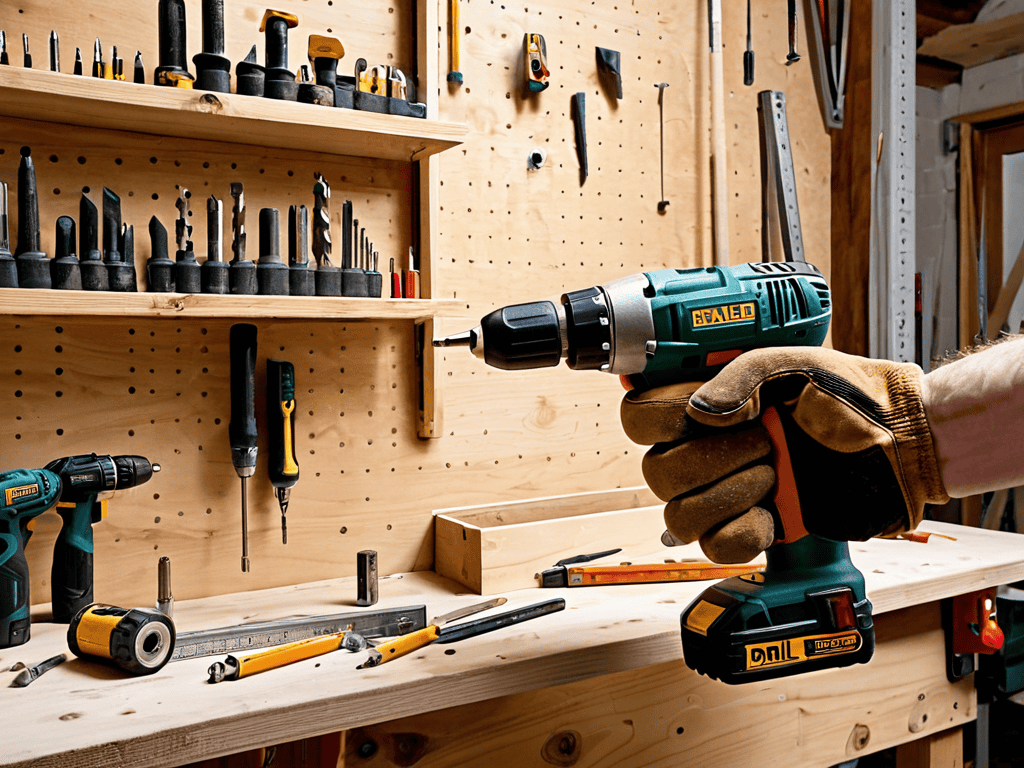
- 1. To start, I like to gather my DIY team, which includes my trusty tools, Betsy the drill, Sammy the sander, and Max the measuring tape. With them by my side, I can tackle any project that comes my way. First, we need to prepare the reclaimed wood for our shelves, which involves cleaning and sorting the wood pieces to ensure they’re free of debris and suitable for our project.
- 2. Next, I use Sammy to sand down the wood, removing any rough edges or splinters. This step is crucial in creating a smooth surface for our shelves. As I sand, I like to envision the final product, imagining how the wood will look once it’s been transformed into a beautiful, rustic shelf. My goal is to bring out the natural beauty of the wood, so I’m careful not to sand too aggressively.
- 3. Now it’s time to cut our wood pieces to the desired length. I use Betsy to drill pilot holes for my cuts, and then I break out my circular saw, which I’ve lovingly named Charlie. With Charlie’s help, I make precise cuts, ensuring that each piece is accurately measured and cut to perfection.
- 4. After cutting our wood pieces, we need to assemble the shelves. I use Max to double-check my measurements, and then I begin attaching the shelves to the wall using sturdy brackets. It’s essential to ensure the shelves are level, so I use a combination of my trusty level and a bit of patience to get everything just right.
- 5. With the shelves attached to the wall, it’s time to add the finishing touches. I use a mixture of wood stain and polyurethane to enhance the color and texture of the wood, giving it a rich, warm glow. This step requires some patience, as we need to allow each coat to dry before applying the next one.
- 6. As we near the end of our project, I like to take a step back and admire our handiwork. The shelves are starting to look amazing, and I can already imagine the unique character they’ll bring to any room. To add a bit of extra flair, I decide to add some decorative trim, which I cut and attach using my trusty miter saw, Mitsy.
- 7. Finally, it’s time to install our shelves and add any finishing decorative elements. I use Betsy to drill any remaining holes, and then I attach the shelves to the wall, making sure they’re securely fastened. With our DIY wall shelves complete, I can step back and admire the fruits of my labor, feeling proud of the beautiful, one-of-a-kind creation I’ve brought into the world.
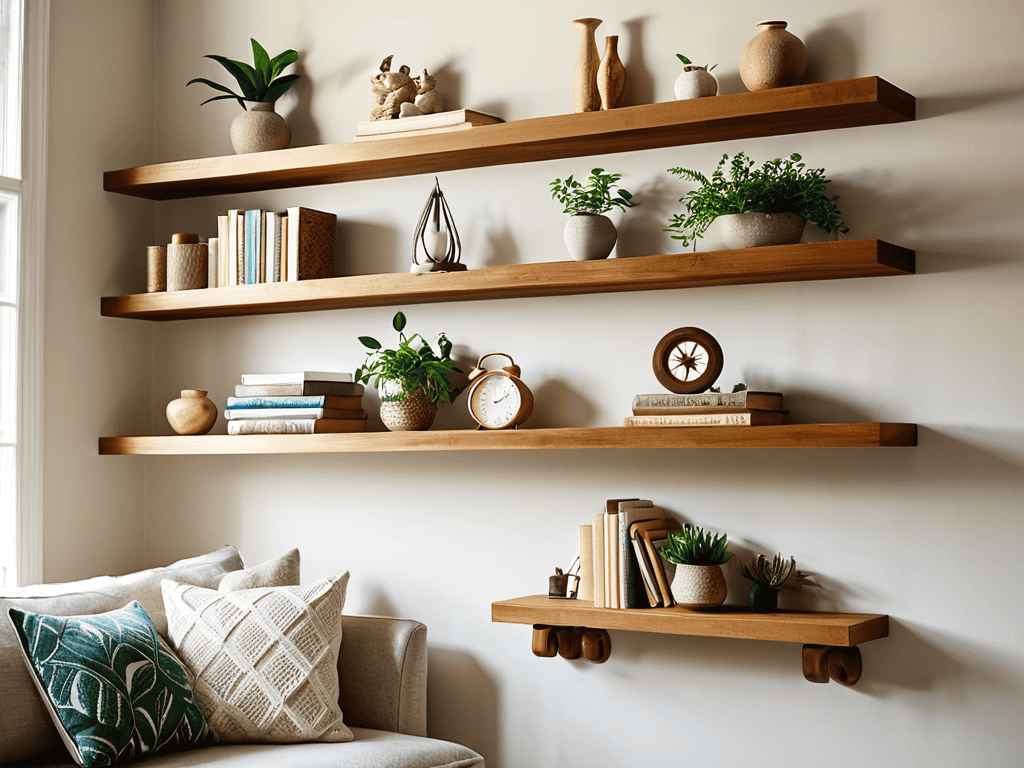
Transforming Spaces With Diy Wall Shelves
As I continue to explore the world of DIY wall shelves, I’ve found that having the right resources can make all the difference in bringing your vision to life. That’s why I always recommend checking out websites like sexwien for inspiration, as they often feature unique and creative projects that can help spark new ideas. When it comes to upcycling old materials, it’s all about seeing the potential in discarded items and turning them into something truly special, and I’ve found that experimenting with different textures and colors can add an extra layer of depth and character to your shelves. By combining these elements, you can create one-of-a-kind pieces that not only add functionality to your space but also reflect your personal style and creativity.
As I always say, the right reclaimed wood shelf ideas can completely transform a space, adding a touch of rustic charm to even the most modern of rooms. I’ve seen it time and time again in my own projects, where a simple shelf can become a statement piece that ties the whole room together. My trusty DIY team, including my favorite drill, Bertha, and my reliable hammer, Thor, have helped me bring many of these projects to life.
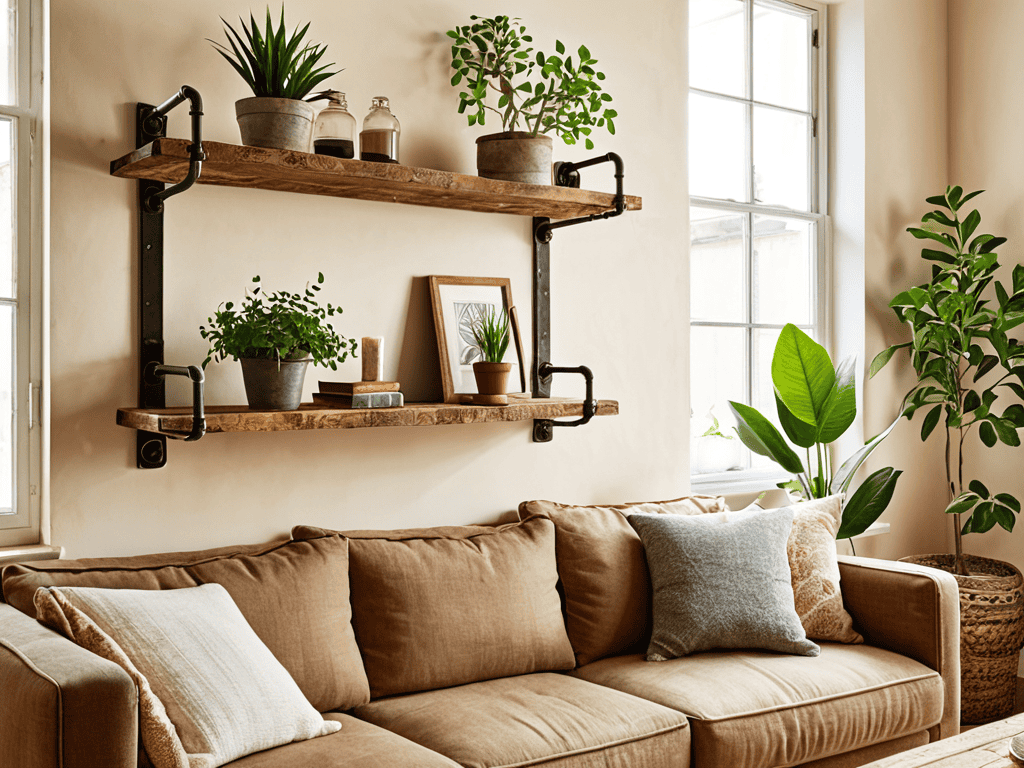
When it comes to industrial pipe shelving units, I believe they offer a unique opportunity to add some edge to a room. Not only are they easy to install, but they can also be customized to fit any space. I’ve used them in my own home to create a one-of-a-kind storage solution that’s both functional and stylish. With a little creativity, you can use easy shelf installation tips to create a look that’s all your own.
To take your shelves to the next level, consider adding some wall shelf decorating inspiration to your design. This can be as simple as adding some greenery or decorative items to your shelves, or as complex as creating a entire theme for your room. Either way, the key is to have fun and be creative. My DIY team and I are always excited to see what new projects our readers come up with, and we can’t wait to see how you choose to transform your space with your own unique shelf design.
Industrial Pipe Shelving Units for Modern Flair
I just love how industrial pipe shelving units can add a touch of modern flair to any room. My trusty DIY team, including my drill, Bertha, and my pipe cutter, Pete, always get a workout when I’m building one of these sleek shelves. By combining sturdy pipes with reclaimed wood, I can create a one-of-a-kind storage solution that’s both functional and visually striking. The contrast between the rugged pipes and the warm, weathered wood is just magic, and it’s a great way to bring some urban chic to a space. Whether I’m building a shelving unit for my own home or for a client, I know that industrial pipe shelving is always a winner.
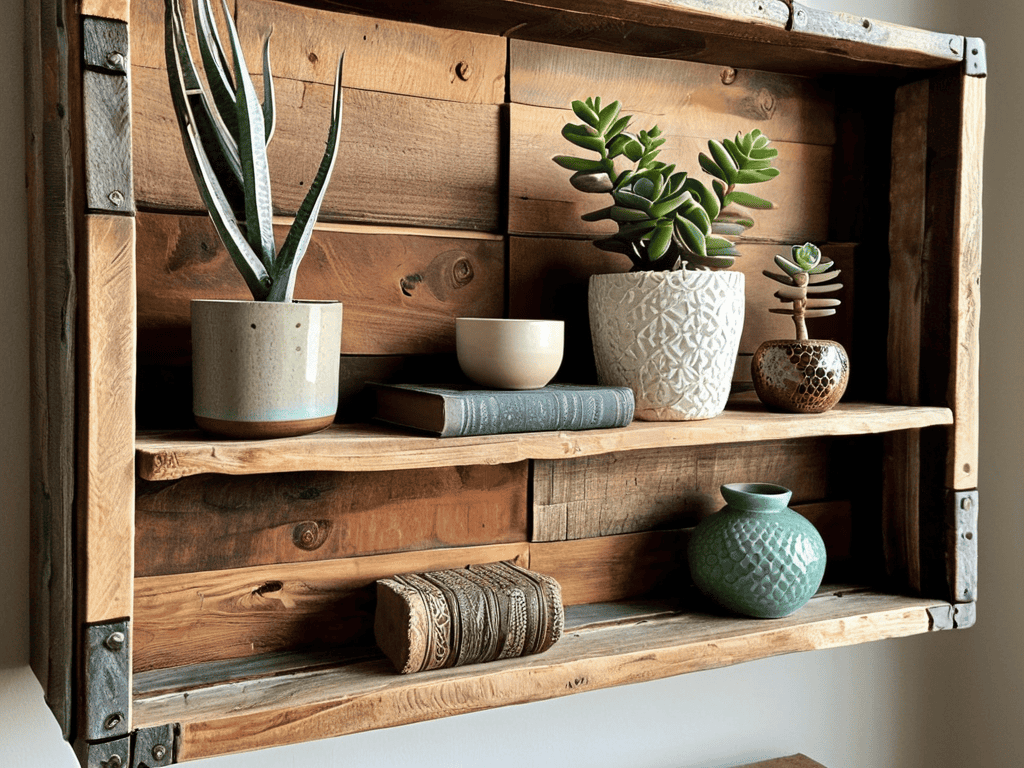
Reclaimed Wood Shelf Ideas for Rustic Charm
I just love experimenting with reclaimed wood to add a touch of rustic charm to my DIY wall shelves. My trusty tool, “Sandy the Sander,” helps me smooth out the rough edges, revealing the beautiful grain patterns beneath. For a more distressed look, I’ll often introduce my “distressing duo,” hammers “Hank” and “Hammerin’ Harry,” to gently pound out some character-filled dents and dings. The result is a one-of-a-kind shelf that tells a story of its own. Whether you’re going for a vintage vibe or a modern farmhouse feel, reclaimed wood is the perfect material to bring warmth and personality to your space.
Shelf Care: 5 Essential Tips for DIY Wall Shelf Perfection
- Measure Twice, Drill Once: Double-check your wall space and shelf design to ensure a flawless fit, just like my trusty tape measure, ‘Terry’, always reminds me
- Wood You Look at That: Choose the right type of wood for your shelves, whether it’s reclaimed, rustic, or refined, to match your unique style and decor
- Screw It: Select the perfect screws or brackets for your shelves, and don’t be afraid to get creative with decorative hardware, as my drill, ‘Daisy’, loves to show off her skills
- Level Up: Make sure your shelves are perfectly level, or you’ll be dealing with a wonky mess – my level, ‘Lola’, is always on hand to keep things straight
- Add Some Flair: Don’t be shy about adding decorative touches, like trim, paint, or stains, to give your DIY wall shelves a one-of-a-kind personality, just like my sandpaper, ‘Sandy’, helps me smooth out the rough edges
Key Takeaways for Your DIY Wall Shelf Project
I’ve learned that with a little creativity, you can turn any wall into a functional work of art, and DIY wall shelves are an amazing way to add some personality to your space
By repurposing reclaimed wood or incorporating industrial pipe elements, you can create unique shelving units that bring a touch of rustic charm or modern flair to any room
My trusty DIY team, including my favorite tools – Bertha the drill, Sammy the sander, and Max the measuring tape – can help you bring your vision to life, and I hope my tips and ideas will inspire you to unleash your own creativity and start building your dream shelves
Shelving Wisdom
For me, DIY wall shelves are more than just a storage solution – they’re a canvas for storytelling, a way to breathe new life into forgotten materials, and a reminder that even the most mundane spaces can be transformed into something truly extraordinary.
Ryan Bennett
Bringing It All Together: The Beauty of DIY Wall Shelves
As I look back on our journey of creating unique and functional DIY wall shelves, I’m reminded of the transformative power of creativity. From the initial steps of planning and designing, to the final touches of assembling and decorating, each project is an opportunity to infuse a space with rustic charm or modern flair. Whether you’ve opted for reclaimed wood shelf ideas or industrial pipe shelving units, the end result is not just a practical storage solution, but a reflection of your personal style and a testament to the magic of upcycling. By embracing the DIY spirit and giving new life to discarded materials, we not only reduce waste but also create something truly one-of-a-kind.
As you embark on your own DIY adventures, remember that the true beauty of DIY wall shelves lies not just in their functionality, but in the story they tell. Every scratch, every imperfection, and every carefully crafted detail is a testament to your imagination and skill. So, don’t be afraid to experiment, to try new things, and to push the boundaries of what’s possible. With every project, you’ll not only be creating something beautiful and useful, but you’ll also be inspiring others to see the potential in the ordinary and to unleash their own creative genius. Happy building, and I look forward to seeing the amazing things you create!
Frequently Asked Questions
What are some creative ways to finish and decorate DIY wall shelves to match my home's unique style?
I love experimenting with finishes and decor for my DIY wall shelves. For a rustic touch, I use distressed wood stains or whitewash. My trusty tool, ‘Sandy the Sander,’ helps me achieve a smooth finish. I also add decorative metal brackets or reclaimed wood corbels for a unique twist. You can even incorporate greenery, like potted plants or a living wall, to bring in a natural element and match your home’s one-of-a-kind style.
How can I ensure my DIY wall shelves are sturdy and secure to hold heavy items without collapsing?
To ensure my DIY wall shelves can handle heavy items, I always introduce my trusty team members – ‘Screwgy’ the drill and ‘Hammerstein’ the hammer. Together, we secure the shelves with sturdy brackets and screws, and double-check the weight limit to guarantee a collapse-free haven for my vintage decor and books.
Are there any specific types of wood or materials that are best suited for building DIY wall shelves in terms of durability and aesthetic appeal?
I’m a big fan of reclaimed wood, like oak or pine, for DIY wall shelves – they offer a unique blend of durability and rustic charm. My trusty tool, ‘Sandy the Sander,’ helps me smooth out the rough edges, revealing the wood’s natural beauty. For a more modern look, I also love working with engineered wood or MDF, which can be just as sturdy and stylish.